Data Lake Uploader Help
Do you have questions or feedback?
If you have questions, issues to report, or feedback to provide, fill out our KPMP feedback form.
How to upload files with the Data Lake Uploader
Tips before you begin…
- Globus Connect Personal is installed and your local endpoint is set up.
See Creating a Globus Connect Personal Endpoint (Mac/Windows/Linux GUI) - You have filled out a current version of the metadata template for your technology
- Your data is organized in your Globus endpoint and ready for upload
Downloading a metadata template
For the most current version of your metadata spreadsheet template:
- Go to https://www.kpmp.org/metadata
- OR -
From within Data Lake uploader, select “Download template” in the upper right corner

- This takes you to the Metadata page displaying all available Metadata Templates
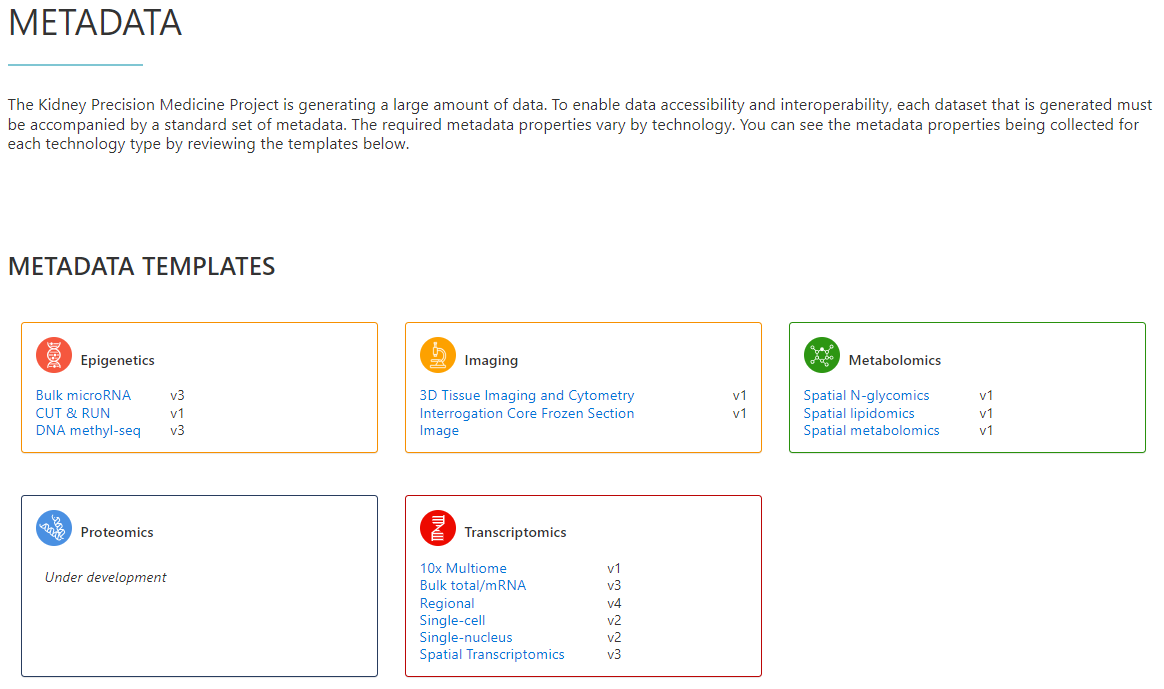
- Select the metadata template for your technology.
Uploading your files
1. Create a package
a. Login to upload.kpmp.org with your institution ID
b. In the upper right corner click “Add new package”

c. The upload page will appear.

- STEP 1: This is simply a reminder to verify everything is set up and ready to go.
- STEP 2: Fill out the Dataset Information section.
- STEP 3: Click the Upload button.
(Note: Items with red asterisk are required before the Upload button becomes active.)
d. The Upload Instructions dialog will appear.
- Behind the scenes, a folder for your files will be created with a new package ID. Click the “open the destination folder” link to go to that folder in Globus Connect.
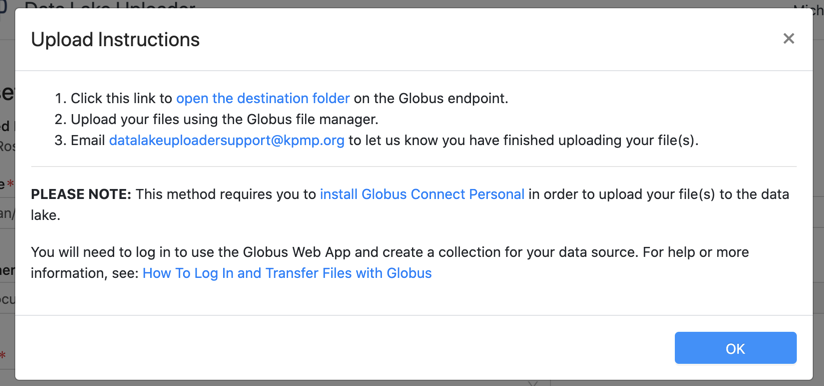
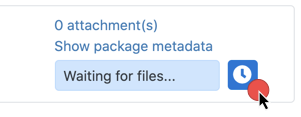
- Tip: You can get back to this link at a later time by clicking on the clock icon next to the status indicator in the Data Lake Uploader:
2. Upload your file(s) with Globus File Manager
a. Click the “open the destination folder” link in the Upload Instructions dialog. If you have not yet logged in, you will be prompted to enter your organizational (institution) ID and password for Globus.
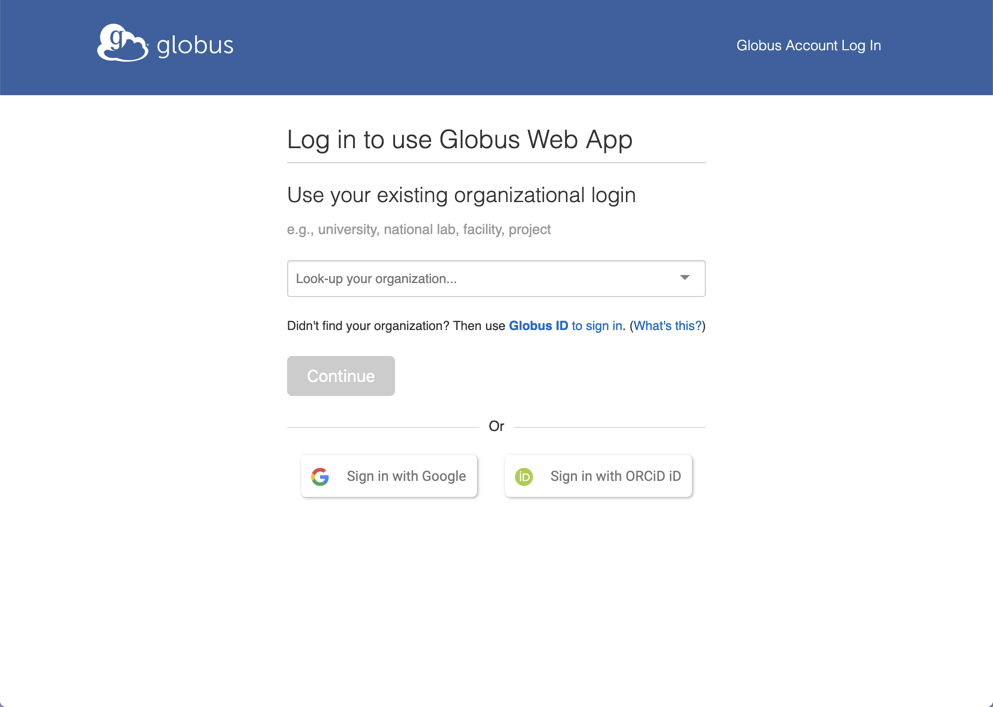
- Note for first time Globus users:
You may be able to use your institutional login, but if you can't, it is recommended to create a new Globus ID account.
b. Once logged in, the Globus File Manager should appear. On one side (left) will be the package folder on our server. On the other (right) you will see “Search for a collection to begin”
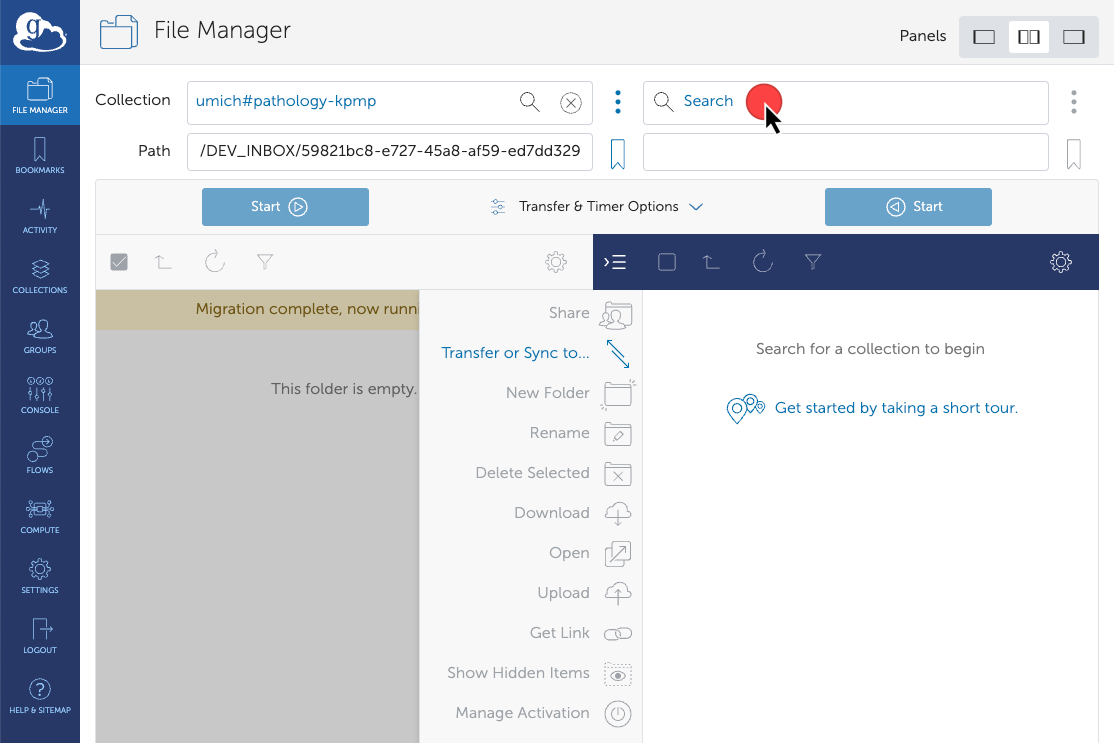
c. Click on the Search box near the top of the File Manager..
d. On the Collection Search pane, select the “Your Collections" tab.
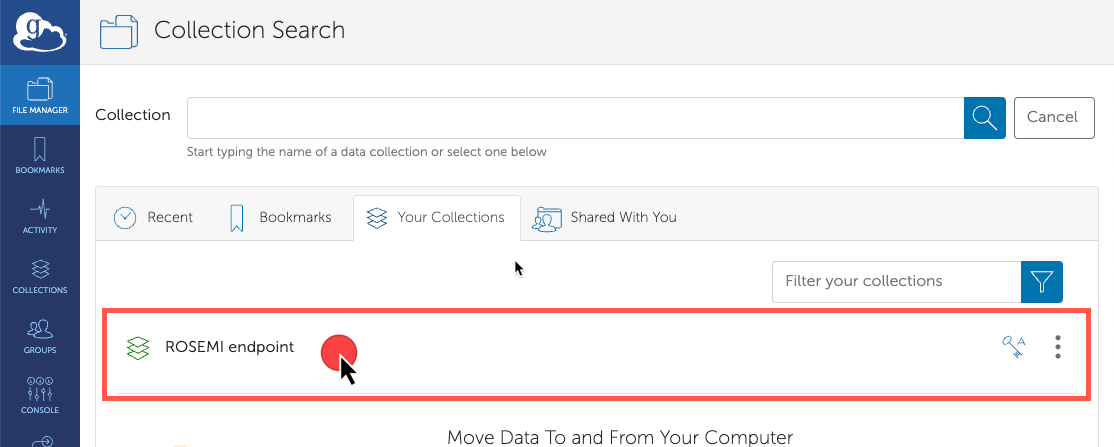
- Tip: If you have not yet started your Globus Connect Personal app, you should do so now. If it is not started, your endpoint will appear with a red icon (shown above). Once Globus Connect is running, you can refresh the page and your endpoint will appear with a green icon.
e. Select the name of the collection with your files. The File Manager will display your endpoint directory contents therein.

f. Navigate to the location of your files. Select and drag the files/folders with your data to the other window and the upload will start.
- Tip: If you can't find the local drive/directory with your files, you may need to grant Globus access to this location (see: Granting Globus Access to Your Files below).
g. The upload process will run in the background until it has completed.
- Tip: The upload process will automatically resume even if you turn off or restart your machine.
h. To check on the status of your upload, click the "Activity" button on the left sidebar menu.
3. Notify support when your upload is completed
When all of your files have been successfully transferred:

a. Click on the datalakeuploadersupport@kpmp.org link in the Upload Instructions dialog to send us an email notifying us that all files in your package have been uploaded. Please include your package ID in the email.
Creating a Globus Connect Personal Endpoint
You'll need to install the Globus Connect Personal software on your computer in order for it to become a Globus Endpoint capable of sending and receiving files.
Detailed instructions for installing Globus Connect Personal on Windows, Mac, and Linux (GUI) can be found here: https://www.globus.org/globus-connect-personal
Once this software is installed and running, your computer will appear as a collection/endpoint in the Globus web interface. You should be able to find it again by clicking "Endpoints" -> "Your Collections". Look for the name of your endpoint/collection that you set when installing Globus Connect Personal. .
Granting Globus Access to Your Files
You may find that when you browse your computer in the File Manager that you cannot navigate to the folder with your data. In this case, it's probably that Globus does not have permission to read/write to that disk or directory.
To fix this:
- Right-click the Globus "G" Icon in your taskbar (On Windows lower-left, on Mac top menu) and select "Options" or “Preferences”.
- In the "Access" tab you can add drives/folders using the "+" button. The "Shareable" option allows public sharing of that path (unusual) and the "Writeable" option allows Globus to write files.
- Just adding a path to this list will automatically give Globus "read" permissions.
Creating a Globus Connect Personal Endpoint in Linux Command-Line
Your analysis files may not be stored on your desktop/laptop, but on a server somewhere. In this case, it might be best to use the Globus Personal Connect for Linux CLI.
Installation instructions can be found here:
https://docs.globus.org/how-to/globus-connect-personal-linux/#globus-connect-personal-cli
Here's a quickstart guide for using Globus CLI:
https://docs.globus.org/cli/quickstart/
And some example commands:
https://docs.globus.org/cli/examples/
Globus Connect Personal for Linux CLI Permissions
It's important to note that, like the desktop version of Globus Connect Personal, you may need to adjust the permissions Globus has to read/write files on your server.
In order to make a directory available to Globus, you will need to add a line to the file "config-paths", usually stored at ~/.globusonline/lta/config-paths.
Example:
The following line lets Globus know that the directory (/myAnalysisData/analysis-12345-9876/), is not publicly shared (0), but has read/write access for Globus (1):
/myAnalysisData/analysis-12345-9876/,0,1